Whether you’re running a personal blog, an online store, or managing a business website, WordPress offers the flexibility and ease of use to help it succeed. But with its popularity comes a downside—WordPress websites are a common target for hackers.
Don’t worry, though! Securing your WordPress site doesn’t have to be intimidating. With the right approach and some essential tips and tricks, you can protect your site from potential threats and keep it safe for your visitors and customers.
In this guide, we’ll walk you through the basics of WordPress security. From choosing a reliable host to implementing advanced security measures, we’ll cover everything you need to know to keep your site secure. Let’s make your WordPress website a fortress against hackers!
Table of Contents
- How to Secure WordPress: Essential Steps to Get Started
- Hardening WordPress Security: Advanced Users Guide
- What to Do if Your WordPress Site’s Security Has Been Compromised?
How to Secure WordPress: Essential Steps to Get Started
Implementing some basic precautions early on can save you from potential headaches. Whether you’re a beginner or just looking to cover the basics, these straightforward tips will help keep your WordPress site secure and safe from the start.
1. Choose a Secure Hosting Provider
One of the foundational steps in securing your WordPress site is selecting a reliable hosting provider. Your hosting service plays a critical role in your site’s security, so it’s essential to choose wisely.
A good hosting provider will offer robust security features to protect your site from attacks. Opting for managed WordPress hosting can also provide added peace of mind, as these services typically include automatic updates and dedicated security measures.
When choosing a hosting provider, look for features such as automated backups, free SSL certificates, 24/7 customer support, built-in firewalls, and continuous security monitoring. These features ensure that your data is protected, sensitive information is encrypted, and any potential issues are promptly addressed.
By choosing a secure hosting provider, you take the first crucial step in safeguarding your WordPress site from potential threats.
2. Install a WordPress Security Plugin
To fortify your WordPress site, installing a security plugin is a must. Security plugins offer comprehensive protection by automatically handling threats and alerting you to vulnerabilities, making it easier to keep your site safe without constant manual oversight.

A good security plugin provides multiple layers of protection. It can scan for malware, block malicious login attempts, and monitor your site for suspicious activity. This proactive approach helps prevent potential breaches and keeps your site secure.
The best security plugin for your WordPress site depends on your specific needs and budget. Here are a few popular options to consider:
- Wordfence Security: Known for its robust firewall and malware scanning capabilities, Wordfence offers real-time threat detection and comprehensive protection.
- All-In-One Security (AIOS): This WordPress plugin provides a wide range of security features, including user account monitoring, firewall protection, and database security. It’s user-friendly and highly customizable.
- Solid Security (Former iThemes Security): With features like two-factor authentication, brute force protection, and database backups, iThemes Security is a solid choice for enhancing your site’s security.
When selecting a security plugin, consider whether your site has already been compromised. If you suspect your site may have been infected, look for plugins that offer malware removal services in addition to preventative measures. Many WordPress security plugins have free versions with basic features, but investing in a premium version can provide more comprehensive protection and peace of mind.
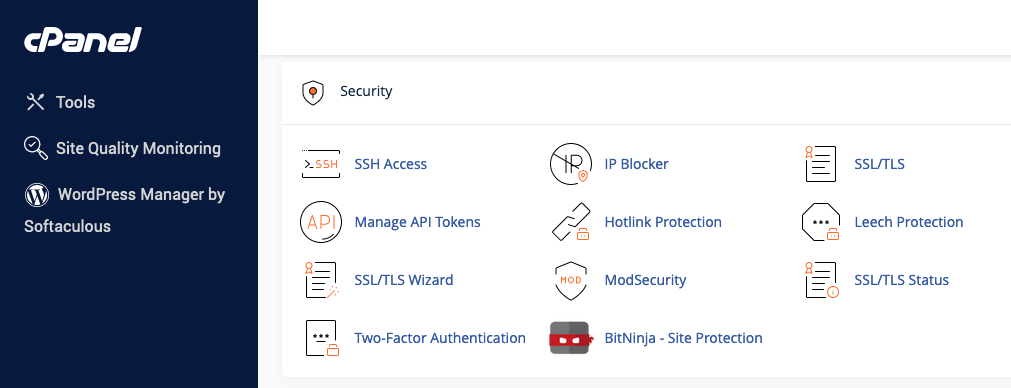
3. Enable a Web Application Firewall (WAF)
A Web Application Firewall (WAF) is an essential tool for securing your WordPress site. By filtering and monitoring incoming traffic, a WAF acts as a barrier between your site and potential threats, protecting it from various cyber-attacks.
A WAF helps defend your site against various attacks, including SQL injections, cross-site scripting (XSS), and distributed denial-of-service (DDoS) attacks. By blocking malicious traffic before it reaches your server, a WAF ensures that your site remains secure and accessible to legitimate users.

Setting up a WAF is typically straightforward. For most cloud-based solutions like Cloudflare, you must sign up for an account, add your website, and follow the setup instructions. For plugins like Wordfence, you can install and configure the WAF directly from your WordPress dashboard.
Enabling a Web Application Firewall adds a critical layer of defense to your WordPress site, ensuring that it remains secure against various threats.
4. Keep WordPress, Themes, and Plugins Up to Date
One of the simplest yet most effective ways to make WordPress secure is to keep everything updated. This includes the WordPress core, your themes, and all installed plugins. Developers regularly release updates to fix security vulnerabilities, improve performance, and add new features. Ensuring you’re always using the latest versions minimizes the risk of your site being compromised.
Updating WordPress is straightforward. You’ll receive a notification in your dashboard whenever a new version is released. Simply follow the prompts to update. Similarly, you’ll see update notifications for themes and plugins, and you can update them directly from your WordPress admin area.

Removing any themes or plugins you’re not using is also important. Inactive software can still pose security risks if not updated. By keeping your site lean and up-to-date, you reduce potential vulnerabilities and ensure that your site is running efficiently.
Set aside time to check for updates at least once a week, or enable automatic updates if possible, to protect your site from the latest threats.
5. Check Themes and Plugins for Vulnerabilities
Before adding new themes and plugins to your WordPress site, ensuring they are secure is crucial. Themes and plugins can be entry points for hackers if they contain vulnerabilities, so taking a few precautions can go a long way in protecting your site.
Firstly, always download themes and plugins from reputable sources, such as the official WordPress repository or trusted developers like WPZOOM. Avoid using nulled or pirated versions, as these often contain malicious code.
Before installing a new theme or plugin, check its reviews and ratings. Look for feedback from other WordPress users regarding its security and performance. Additionally, ensure the developer actively maintains and updates the software. Regular updates indicate that the developer is committed to fixing bugs and addressing security issues.
By taking these steps, you can significantly reduce the risk of security breaches through compromised themes and plugins.
6. Enable SSL and HTTPS
Securing your WordPress site with SSL (Secure Sockets Layer) and HTTPS (Hypertext Transfer Protocol Secure) is essential for protecting sensitive data and building trust with your visitors. SSL encrypts the data transferred between your website and its users, preventing unauthorized access to information such as login credentials, personal details, and payment information.
To enable SSL on your WordPress site, you’ll need an SSL certificate. Many hosting providers offer free SSL certificates through services like Let’s Encrypt. Check with your hosting provider to see if they include SSL certificates in their plans and ask them to activate it for you if it’s not already enabled.
Once you have your SSL certificate, you must configure your WordPress site to use HTTPS. You can do this by updating your site’s URL settings in the WordPress dashboard. Go to Settings > General and change both the WordPress Address (URL) and Site Address (URL) to include https:// instead of http://.
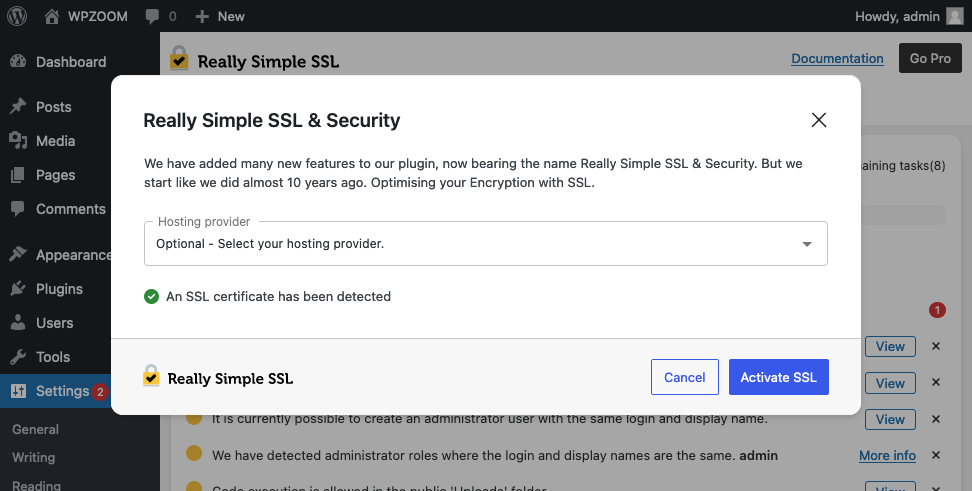
Next, ensure that all your site’s content is served securely over HTTPS. You can use WordPress plugins like Really Simple SSL, which automatically detect your settings and configure your website to run over HTTPS.
Enabling SSL and HTTPS protects your site and its users and boosts your SEO ranking, as search engines like Google prioritize secure sites.
7. Secure Your WordPress Login Page
Securing your WordPress login page is crucial because it’s a common target for hackers attempting to gain access to your site. By implementing a few key strategies, you can significantly enhance the login security and protect your site from unauthorized access.

- Use Strong Passwords. Encourage all users to create strong passwords that include a mix of uppercase and lowercase letters, numbers, and special characters. Strong passwords are much more challenging for attackers to guess or crack.
- Enable Two-Factor Authentication (2FA). Two-factor authentication adds an extra layer of security by requiring users to enter a one-time code generated on their mobile device or received via email in addition to their password. This ensures that even if a password is compromised, the attacker cannot access the account without the second factor.
- Limit Login Attempts. Limiting the number of login attempts can prevent brute force attacks, where hackers try numerous username and password combinations. Use a plugin to restrict the number of failed login attempts and temporarily lock out users who exceed the limit.
- Change the Default Login URL. Changing the default WordPress login URL from “/wp-admin” or “/wp-login.php” to a unique URL can help obscure your login page from attackers.
- Add CAPTCHA or Security Questions. Adding CAPTCHA or security questions to your login page can deter automated bots from attempting to log in.
- Enable Auto-Logout for Inactive Users. Auto-logout plugins can automatically log out users after a specified period of inactivity, reducing the risk of unauthorized access from unattended devices.
- Review User Accounts Regularly to ensure only authorized users can access your site. Remove any inactive or suspicious accounts to minimize potential security risks.
By securing your WordPress login page with these measures, you can protect your site from unauthorized access and ensure that only legitimate users can log in.
8. Create Frequent Backups
Creating frequent backups of your WordPress site is one of the best ways to protect your data and ensure you can quickly recover from any issues. Regular backups allow you to restore your site to a previous state in case of hacking, server failure, or accidental data loss.
There are several methods to create backups. One of the most convenient options is to use a backup solution included in your hosting package. Many hosting providers offer automated backup services that can be scheduled to run daily, weekly, or at intervals that suit your needs. These backups are usually stored off-site, adding an extra layer of protection.

Alternatively, you can use a dedicated WordPress backup plugin. Plugins like UpdraftPlus, Duplicator, and WP STAGING are popular choices that offer comprehensive backup solutions. These plugins allow you to schedule automatic backups and store them in various locations, such as cloud storage services like Google Drive, Dropbox, or Amazon S3. They also make it easy to restore your site with just a few clicks.
It’s important to ensure that your backups include both your site files and the database. Your site files contain all the media and code, while the database stores your content, settings, and user information. A complete backup ensures you can fully restore your site in case of any issues.
By creating frequent backups and having a reliable backup strategy in place, you can safeguard your WordPress site against data loss and minimize downtime, ensuring that you can quickly recover from any unforeseen events.
9. Monitor Site Activity
Monitoring the activity on your WordPress site can help you detect unauthorized access or changes. Activity log plugins, such as WP Activity Log, keep a detailed record of all user actions on your site, including logins, updates, and content changes.
By regularly reviewing these logs, you can identify any suspicious behavior and take appropriate action to secure your site. Keeping an eye on your site’s activity is a proactive way to maintain its security and ensure that only authorized users are making changes.
Hardening WordPress Security: Advanced Users Guide
Once you’ve covered the basic security measures, it’s time to take your WordPress site’s protection to the next level. Advanced security techniques provide an extra layer of defense against sophisticated attacks and vulnerabilities.
These WordPress security tips are designed for website admins and owners with a solid understanding of WordPress and website security. They are highly effective in fortifying your site. Let’s harden your WordPress site!
1. Disable File Editing
Disabling file editing in WordPress is crucial in protecting your website from unauthorized changes or malicious code injections. By default, WordPress allows administrators to edit theme and plugin files directly from the WordPress dashboard. While this feature can be convenient for quick updates, it poses a significant security risk if an unauthorized user gains access to your admin panel.
To disable file editing, you need to add a simple line of code to your wp-config.php file. This will prevent anyone from accessing the theme and plugin editors within the WordPress dashboard.
Here’s how to do it:
- Connect to your website using an FTP client or your hosting provider’s file manager.
- Locate the wp-config.php file in the root directory of your WordPress installation and open it in a text editor.
- Add the following line of code just before the line that says, “That’s all, stop editing! Happy blogging.”:
define('DISALLOW_FILE_EDIT', true);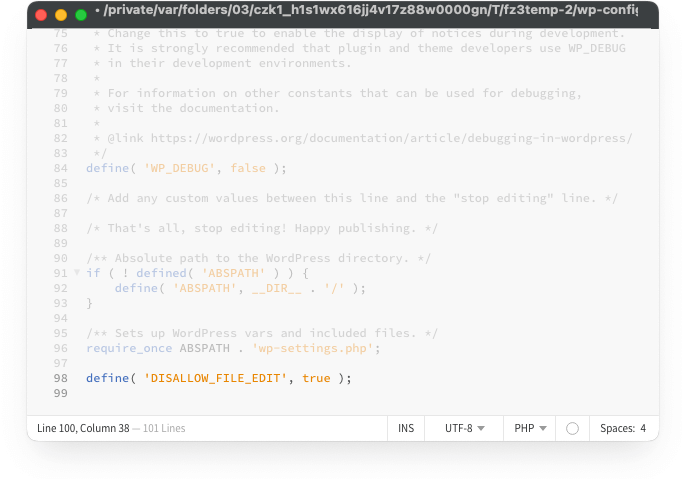
- Save the changes and upload the wp-config.php file back to your server if you’re using an FTP client.

By adding this line of code, you effectively disable the file editing feature in the WordPress dashboard, making it harder for attackers to insert malicious code into your site.
2. Disable PHP File Execution in Certain WordPress Directories
Disabling PHP file execution in specific WordPress directories is a powerful security measure that helps protect your site from malicious scripts. Certain directories, like the /wp-content/uploads/ folder, are meant to store user-generated content, and allowing PHP execution in these folders can pose a significant security risk.
To disable PHP execution in these directories, you need to create a .htaccess file with specific rules. Here’s how you can do it:
- Open a text editor and create a new file named .htaccess.
- Add the following code to the .htaccess file to disable PHP execution:
<Files *.php>
deny from all
</Files>
- Save the .htaccess file and upload it to the directories where you want to disable PHP execution, such as /wp-content/uploads/, /wp-includes/, or /wp-content/themes/.

Placing this .htaccess file in specific directories prevents any PHP scripts within those folders from being executed. This is particularly useful in the uploads directory, where allowing PHP execution can lead to severe vulnerabilities.
3. Change the WordPress Database Prefix
Changing the default WordPress database prefix is an effective way to enhance your site’s security and protect it from SQL injection attacks. By default, WordPress uses the prefix wp_ for all database tables. Hackers often target this default prefix in their attacks, so changing it to something unique can add an extra layer of security.
Here’s how to change your WordPress database prefix:
- Before making any changes, ensure you have a complete database backup. You can use plugins like UpdraftPlus or your hosting provider’s backup tools to create a backup.
- Locate the wp-config.php file in the root directory of your WordPress installation. Open it in a text editor and find the following line:
$table_prefix = ‘wp_’; - Change wp_ to a unique prefix. For example:
$table_prefix = ‘uniqueprefix_’; - After changing the prefix in wp-config.php, you must update the existing database table names. You can do this manually via phpMyAdmin:
Log in to your phpMyAdmin. Select your WordPress database. Rename each table by changing the prefix from wp_ to your new prefix. For example, rename wp_posts to uniqueprefix_posts. Repeat this for all WordPress tables.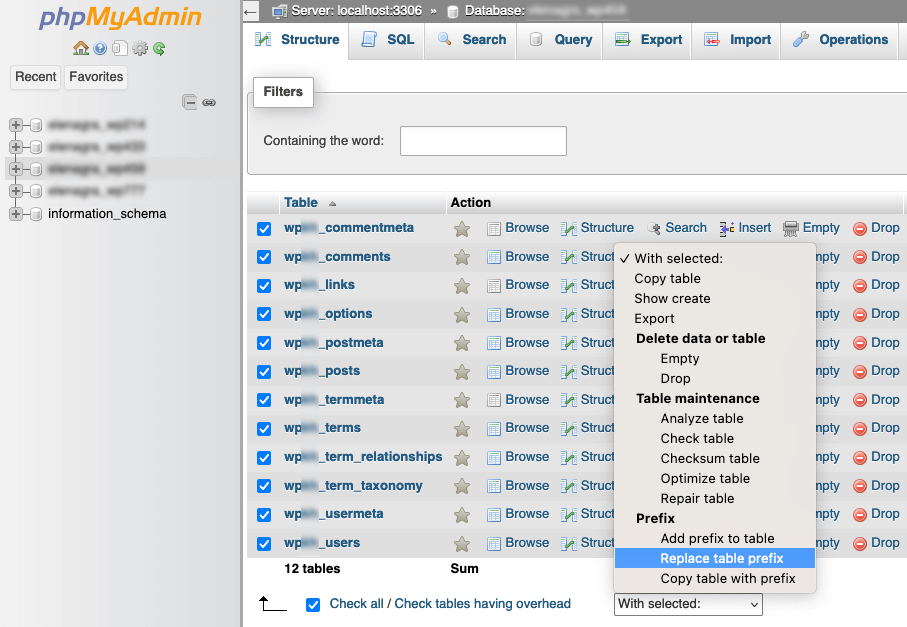
You can also do this by using a plugin. - Ensure that all instances of the old prefix are updated to the new prefix in wp-config.php and any other custom scripts or plugins that might reference the database tables.
- After making these changes, thoroughly test your site to ensure everything works correctly. Check that all plugins, themes, and functionalities are operating as expected.

Changing the WordPress database prefix makes it more difficult for attackers to predict your database table names, thus reducing the risk of SQL injection attacks.
4. Disable Directory Indexing and Browsing
Disabling directory indexing and browsing is an important WordPress site security measure to prevent unauthorized users from accessing the contents of your website’s directories. When directory indexing is enabled, visitors can see a list of files in your directories, exposing sensitive information and making it easier for hackers to find vulnerabilities.
To disable directory indexing and browsing, you need to modify your .htaccess file. Here’s how to do it:
- If you don’t already have a .htaccess file in the root directory of your WordPress installation, create one using a text editor. If the file exists, open it for editing.
- Add the following line of code to your .htaccess file to disable directory indexing:
Options -Indexes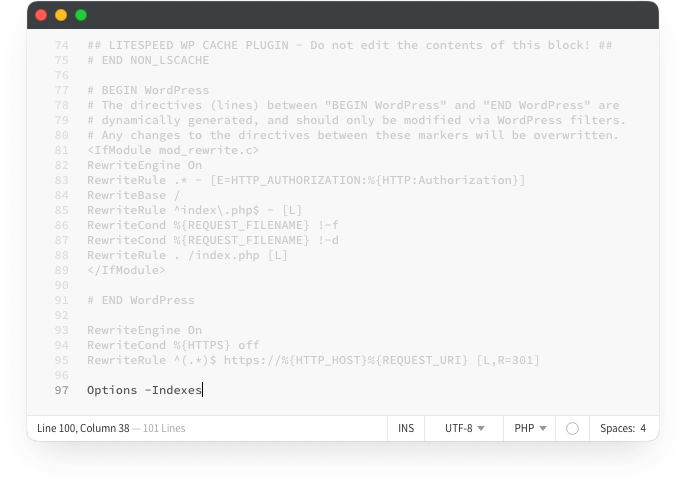
- Save the .htaccess file and upload it to the root directory of your WordPress installation using an FTP client or your hosting provider’s file manager.

Adding this simple line of code prevents the web server from displaying a list of files in any directory that does not have an index file. This makes it harder for potential attackers to discover sensitive files and directories on your website.
5. Disable XML-RPC in WordPress
XML-RPC (Extensible Markup Language Remote Procedure Call) is a protocol that allows remote access to your WordPress site. While it can be helpful for specific applications, such as mobile apps and external services, it also poses a significant security risk. XML-RPC can be exploited for brute force attacks, DDoS attacks, and other vulnerabilities.
To enhance the security of your WordPress site, it’s a good idea to disable XML-RPC if you don’t need it.
The easiest way to disable XML-RPC is by using a plugin. There are several plugins available that can help you with this, such as Disable XML-RPC. Simply install and activate the plugin, and it will automatically disable XML-RPC on your site.
If you prefer not to use a plugin, you can disable XML-RPC manually by adding some code to your .htaccess file or your theme’s functions.php file.
Using .htaccess:
- Open your .htaccess file in a text editor.
- Add the following code to disable XML-RPC:
<Files xmlrpc.php>
order deny,allow
deny from all
</Files>
- Save and upload the .htaccess file to your server.

Using functions.php:
- Open your theme’s functions.php file in a text editor.
- Add the following code to disable XML-RPC:
add_filter('xmlrpc_enabled', '__return_false'); - Save and upload the functions.php file to your server.
This is a simple yet effective way to enhance your site’s security, especially if you do not use XML-RPC for any legitimate purposes.
6. Secure .htaccess Configurations
The .htaccess file is a powerful configuration file used by the Apache web server, which many WordPress sites run on. It controls various server settings and can be used to enhance your site’s security significantly. Properly securing your .htaccess file can protect your WordPress site from multiple threats.
Here are several vital configurations to secure your .htaccess file:
Prevent Access to .htaccess
The .htaccess file itself should be protected from unauthorized access. Add the following code to your .htaccess file to prevent anyone from viewing or editing it:
<Files .htaccess>
order allow,deny
deny from all
</Files>
Restrict Access to wp-config.php
The wp-config.php file contains sensitive information about your WordPress installation, including database credentials. Protect it by adding the following code to your .htaccess file:
<Files wp-config.php>
order allow,deny
deny from all
</Files>
Disable Directory Browsing
To prevent users from viewing the contents of directories that do not have an index file, disable directory browsing by adding this line to your .htaccess file:
Options -IndexesProtect wp-includes Directory
The /wp-includes/ directory contains core WordPress files that users should not access directly. Add the following code to your .htaccess file to protect this directory:
<IfModule mod_rewrite.c>
RewriteEngine On
RewriteBase /
RewriteRule ^wp-admin/includes/ - [F,L]
RewriteRule !^wp-includes/ - [S=3]
RewriteRule ^wp-includes/[^/]+\.php$ - [F,L]
RewriteRule ^wp-includes/js/tinymce/langs/.+\.php - [F,L]
RewriteRule ^wp-includes/theme-compat/ - [F,L]
</IfModule>
Disable Image Hotlinking
To prevent other websites from using your images and consuming your bandwidth, disable hotlinking by adding this code to your .htaccess file:
RewriteEngine on
RewriteCond %{HTTP_REFERER} !^$
RewriteCond %{HTTP_REFERER} !^http(s)?://(www\.)?yourdomain.com [NC]
RewriteRule \.(jpg|jpeg|png|gif)$ - [F]
Replace yourdomain.com with your actual domain name.
Block Author Scans
Hackers often scan for author usernames, which they can then use in brute-force attacks. To block these scans, add the following code to your .htaccess file:
RewriteEngine On
RewriteBase /
RewriteCond %{REQUEST_URI} ^.*(wp-comments-post|wp-login|xmlrpc)\.php$
RewriteCond %{HTTP_USER_AGENT} ^.*(libwww-perl|curl|wget).*$ [NC,OR]
RewriteCond %{HTTP_REFERER} !^http(s)?://(www\.)?yourdomain.com [NC]
RewriteRule ^(.*)$ - [F,L]
Replace yourdomain.com with your actual domain name.
These measures will help protect your site from unauthorized access, bandwidth theft, and other common threats.
Always backup your .htaccess file before making changes to ensure you can restore it if something goes wrong.
7. Move wp-config.php Outside the Root Folder
The wp-config.php file is one of the most critical files in your WordPress installation. It contains your database credentials, authentication keys, and other sensitive information. Moving this file outside the root folder can provide an extra layer of security, making it harder for attackers to access.
Here’s how you can move the wp-config.php file outside the root folder:
- Create a new directory above your WordPress root directory where you’ll move the wp-config.php file. For example, if your WordPress site is installed in /public_html/, you might create a new directory called /config/.
- Using an FTP client or your hosting provider’s file manager, move the wp-config.php file from the root directory to the new directory you created. For example, move it from /public_html/wp-config.php to /config/wp-config.php.
- After moving the wp-config.php file, you must let WordPress know where to find it. Open the original location of the wp-config.php file (now empty) in the root directory and create a new wp-config.php file with the following code:
<?php
// Move wp-config.php file one directory level up
require_once(dirname(__FILE__) . '/../config/wp-config.php');
Adjust the path in the code above if your new directory is located differently. - Visit your website to ensure everything is working correctly. If you encounter any issues, double-check the file path and ensure the wp-config.php file is readable by the server.
Moving the wp-config.php file outside the root directory makes it more difficult for attackers to access this crucial file.
Remember, it’s always a good practice to back up your wp-config.php file and your entire site before making such changes, just in case something goes wrong.
8. Hide the WordPress Version
Hiding the WordPress version number from your site’s source code is a simple yet effective security measure. Knowing the specific version of WordPress you are using can help hackers identify vulnerabilities associated with that version. By concealing the version number, you make it more difficult for attackers to target your site.
Here’s how you can hide the WordPress version:
Remove the Version Number from the Header
By default, WordPress adds the version number to the HTML header of your site. You can remove this by adding a small code snippet to your theme’s functions.php file.
Open your theme’s functions.php file and add the following code:
// Remove the WordPress version number from the header
remove_action('wp_head', 'wp_generator');
Remove Version Number from RSS Feeds
WordPress also adds the version number to RSS feeds. To remove it, add the following code to your theme’s functions.php file:
// Remove WordPress version number from RSS feeds
add_filter('the_generator', '__return_empty_string');
Hide Version Number in Scripts and Styles
WordPress includes the version number in the URLs of scripts and styles by default. To remove these, add the following code to your theme’s functions.php file:
// Remove WordPress version number from scripts and styles
function remove_wp_version_strings($src) {
global $wp_version;
parse_str(parse_url($src, PHP_URL_QUERY), $query);
if (!empty($query['ver']) && $query['ver'] === $wp_version) {
    $src = remove_query_arg('ver', $src);
}
return $src;
}
add_filter('script_loader_src', 'remove_wp_version_strings');
add_filter('style_loader_src', 'remove_wp_version_strings');
Remove Version Number from Meta Tags
Some themes and plugins may add the WordPress version number to meta tags. To remove these, add the following code to your theme’s functions.php file:
// Remove WordPress version number from meta tags
function remove_meta_version() {
return '';
}
add_filter('the_generator', 'remove_meta_version');
This makes it more difficult for attackers to exploit known vulnerabilities associated with specific WordPress versions, enhancing your site’s overall security.
Remember to backup your functions.php file before making these changes to ensure you can revert back if needed.
9. Block Hotlinking
Hotlinking occurs when other websites directly link to the files on your server, such as images or videos, instead of hosting them on their own servers. This can consume your bandwidth and slow down your site. To prevent this, you can block hotlinking by configuring your .htaccess file.
Here’s how to block hotlinking:
- If you don’t already have a .htaccess file in the root directory of your WordPress installation, create one using a text editor. If the file exists, open it for editing.
- Add the following code to your .htaccess file to block hotlinking:
# Block hotlinking of images
RewriteEngine on
RewriteCond %{HTTP_REFERER} !^$
RewriteCond %{HTTP_REFERER} !^http(s)?://(www\.)?yourdomain.com [NC]
RewriteCond %{HTTP_REFERER} !^http(s)?://(www\.)?your-other-domain.com [NC]
RewriteRule \.(jpg|jpeg|png|gif|bmp)$ - [F,NC,L]
Replace yourdomain.com with your actual domain name. If you have other domains from which you want to allow hotlinking, such as a content delivery network (CDN) or a partner site, add them in place of your-other-domain.com. - Save the .htaccess file and upload it to the root directory of your WordPress installation using an FTP client or your hosting provider’s file manager.
By adding this code, you instruct the server to block requests for image files (e.g., .jpg, .jpeg, .png, .gif, .bmp) from any site that isn’t listed in the allowed domains. Visitors from unauthorized sites will see broken image links instead of your content, thus preventing them from using your bandwidth.
Blocking hotlinking helps protect your server resources and ensures that your bandwidth is used only by your intended audience. This simple measure can improve your site’s performance and reduce unnecessary load on your server.
Remember to test your site after making these changes to ensure that images are still loading correctly on your own domain.
What to Do if Your WordPress Site’s Security Has Been Compromised?
Despite taking all necessary precautions, there’s still a chance that your WordPress site could be compromised. If you suspect your site has been hacked, it’s essential to act quickly and methodically to minimize damage and restore your site.
Here’s a step-by-step guide on what to do if your WordPress site’s security has been compromised:
- Stay calm and assess the situation. Panicking can lead to hasty decisions that might cause more harm. Take a deep breath and prepare to address the issue systematically.
- Put your site in maintenance mode to prevent visitors from accessing your compromised site. This helps contain any damage and prevents users from interacting with potentially harmful content.
- Immediately change all passwords associated with your WordPress site, including admin, FTP, database, and any other accounts with access to your site. Ensure that the new passwords are strong and unique.
- Scan for malware and malicious code using a security plugin. These tools can help identify infected files and suspicious activity. Note any issues found during the scan.
- Check for unauthorized users. Review your site’s user accounts and look for any unauthorized or suspicious accounts. Remove any accounts that you did not create, or that appear to be compromised.
- Update everything. Ensure your WordPress core, themes, and plugins are all updated to the latest versions. Updates often include security patches that can help protect your site from vulnerabilities that may have been exploited.
- Notify interested parties. If your site handles sensitive data or impacts other stakeholders, notify them of the security breach. This includes partners, clients, and users who may be affected. Transparency is crucial in maintaining trust and allowing others to take necessary precautions.
- Remove malicious code and backdoors from your site, using the information from your malware scan. This may involve manually deleting infected files or using your security plugin’s cleanup features. Ensure that all traces of the attack are eliminated.
- Check if your site has been blacklisted by search engines due to the hack. You can use tools like Google Search Console to see if there are any security warnings. If your site has been flagged, follow the steps provided to request a review after cleaning up the site.
- Restore from a clean backup. If you have a recent site backup from before the compromise, consider restoring it. Ensure that the backup is clean and free from any infections. This can be a quick way to return your site to a secure state.
- Strengthen your site’s security. After recovering from a security breach, it’s crucial to strengthen your site’s defenses to prevent future attacks. Implement the security measures outlined in this guide, and consider additional steps like enabling two-factor authentication and regular security audits.
- Keep a close eye on your site for any signs of recurring issues. Regularly monitor security logs and perform routine scans to ensure that your site remains secure.
Recovering from a security breach can be challenging, but following these steps can effectively address the issue and protect your site from future threats. Remember, maintaining good security practices is an ongoing process that requires vigilance and regular updates.
Bottom Line
Securing your WordPress site is an ongoing process that requires diligence, regular updates, and a proactive approach. By implementing the essential and advanced security measures outlined in this guide, you can significantly reduce the risk of your site being compromised.
In the unfortunate event that your site’s security is breached, acting swiftly and methodically can help you mitigate damage and restore your site. Always stay calm, follow the steps to clean and secure your site, and learn from the experience to bolster your defenses.
Remember, the best defense is a good offense. Regularly educate yourself about new security threats and WordPress security best practices, and keep your security measures up to date. By staying vigilant and proactive, you can ensure that your WordPress site remains safe and secure for your visitors and customers.